
How to Fit and Zero a Scope on an Air Rifle
So, you have your air rifle, pellets, targets and backstop set up. But how do you get the best from your shooting experience? To make any airgun the most accurate and most fun it can be, fitting a scope is almost essential. The below is designed to be a simple guide for beginners, to get the most of their shooting experience.
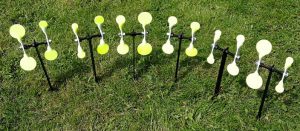
Garden Airgun Target Range
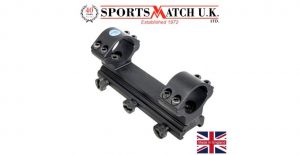
The first thing to decide on is a suitable set of scope mounts to attach it to your rifle. This depends on what options you have on the rifle, and the size of the scope tube. The most common fitting type for the UK is a standard (9.5-11.5mm) Dovetail rail or groove on the rifle, with a one-inch scope tube. Sportsmatch mounts are renowned for being the most stable and reliable mounts available, and you should always use a one-piece mount if possible. Most spring and piston (break barrel or underlever) airguns will allow a one-piece mount. However, some pre-charged PCP airguns will have an open recess allowing for a multi-shot magazine, and so two-piece mounts are the only suitable option. Regarding the height of the scope, you should try to purchase the mounts that get the scope as low and as close to the rifle as possible, taking care to ensure no part of the scope actually makes contact with anything other than the mounts. Some scopes can have large diameter lenses, these must not touch the barrel or any other part of the rifle.
Now you have your rifle, scope and suitable mounts. It’s time to connect them all together! Firstly the scope must be attached to the mounts, ideally with equal clearance between each mounting point and either end of the scope. This is simple with a one-piece mount but can become tricky with a set of two-piece mounts and other obstacles that may be in the way. Don’t over-tighten any screws at this stage, as adjustments may be necessary.
Once the scope is in the mounts, it’s time to attach the mounts to the rifle. Place the mounted scope onto the rail on the rifle and very loosely tighten the screws. Then, with the rifle comfortably in the shoulder, you can move the scope forwards or backwards closer or further away from your eye to give the best sight picture through the scope. Once you are comfortable and happy with the distance (known as eye relief), you can tighten down the screws attaching the mounts to the rifle.
Now you can secure the scope into place in the mounts, ensuring there is no canter in the scope and the horizontal axis on the reticle in your scope is perfectly parallel with the horizon. This can be achieved by using a surface you know to be completely horizontal and matching the reticle up to that surface or line.
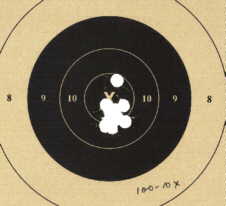
Shooting slightly low
Your rifle and scope are attached, it’s in a comfortable position, so now I’m going to hit the bullseye right? Unfortunately not. Every scope and rifle is different, and the two need to be matched up together so that the pellet hits the centre of the crosshairs, exactly where you aim to. To achieve this, you must first decide a suitable distance to “set your zero”. If you are using your rifle to shoot targets in your garden then this is simple, as you will know exactly which distance you are going to shoot at with every shot.
For this task, you will need a sturdy and secure rest to shoot from. Our most popular item for this purpose would be the MTM Predator Shooting Rest. It is adjustable to fit any rifle, and with holding points at both the front and rear it holds any rifle securely and in the same position. If needed, you can attach a small piece of masking tape to the two points on the rifle where it sits in the rest, ensuring it sits in the exact same position each shot.
Now you are set up, you will need to shoot at a paper target to see where the centre of the crosshairs are in relation to where the pellet hits the target. For example, you aim the crosshairs at the centre of the bullseye, but the pellet hits high or low or to the left or right. So you know you have to aim off right? Nope, every scope allows you to adjust the position of the centre of the crosshairs. To do this, you may need to remove a turret cover on the scope to adjust left/right (windage) and up/down (elevation) with a coin, or some scopes allow you to simply twist the turret to move the centre of the crosshairs. This will take a few adjustments and a few shots, but eventually, you can adjust the crosshairs enough so that the pellet hits the target dead-on centre of the crosshairs, or “hits zero”. Don’t forget, if you are shooting outside there will be other factors to consider, including the wind. Also, the quality and type of pellets used can make a difference, as well as the air pressure in the cylinder if shooting a PCP or pre-charged rifle.
One last thing to remember, every time you take the rifle and scope out of its case or storage, it’s always a good idea to check the zero again before shooting. Also, if you are shooting over different distances then there are other adjustments you can make by using your aim or your scope, but that’s a whole other subject for another day…